June is all about colorful landscapes at Xpozer. To help you get the best possible pictures, photographer Cuma Cevik shares his 10 tips to consider when shooting Colorful Landscapes.
Landscape photography or Nature photography
– Cuma Cevik
Landscape photography is one of the most preferred branches for beginners and is often confused with nature photography.
Nature photography is about photographing natural life, and human-made elements should be avoided in these pictures. However, landscape photography covers a broader area than nature photography and has no sharp boundaries. Human-made elements are therefore allowed, as they can be part of any landscape.
Taking photos is mostly creating a composition. Even if we’re not aware of it, it’s something we do when taking photos. Those who are new to photography may think that their photographs are instantly pretty when they have captured the beauty of nature in nature photographs, or the appeal of scenery in landscape photographs. But creating these beautiful images is not as simple as you might think; it is the details that make your photos special.
So, I have summarised ten simple steps about landscape photography, so you’ll know how to make your best shot for a photo contest.
1. Gather a little information about the shooting location
Knowing the location will increase your chances of taking better pictures. By doing a little research on the internet, you can gather information, take a look at the previously taken photos of the location, and even take a short virtual tour from apps like Google Maps. You can come up with interesting compositions that have not been used before, by seeing the photos previously taken by others.
2. Take photos at the right time
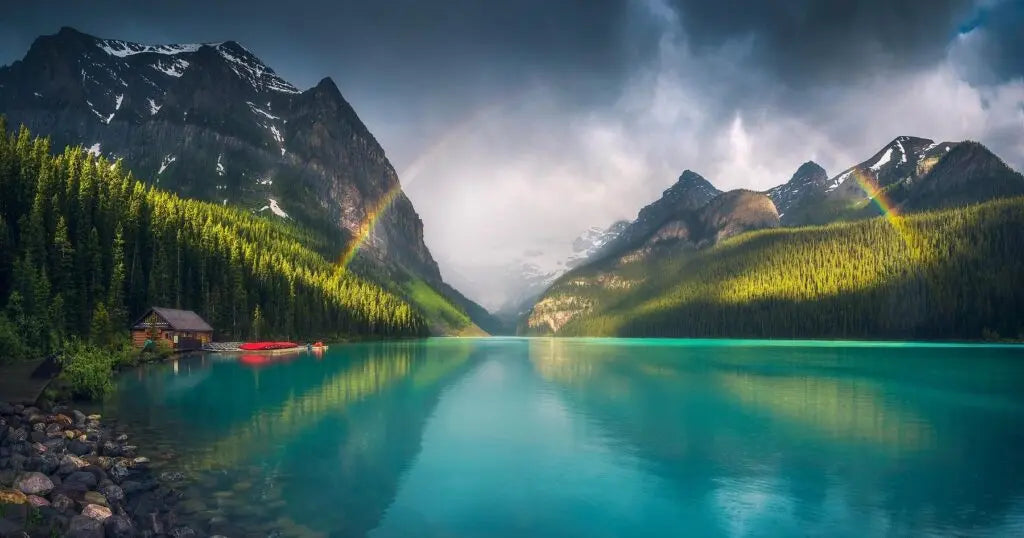
Sunrise and sunset are what we call golden hours for warm color tones and soft light transitions. Taking photos at noon from the wrong angle will destroy the sense of depth in the photo and create light errors. What matters is quality, soft light rather than hard light that you’ll find during the day.

If you are at the photoshoot location 30 minutes before or after sunrise, or 1 hour before sunset, you can get very nice results. After the end of the golden hour at sunset, the so-called blue hour begins, and this period of time is ideal for taking beautiful cityscapes.
Almost all of the landscape photographs published in National Geographic magazine are photographs taken in golden or blue hours. The essential trick to taking beautiful photos is to set off before dawn or to go home after sunset.
3. Take photos from above and below, not only at eye level
Taking photos from a different angle than we see in daily life, will enable us to achieve more creative results. Especially when shooting landscape or nature photos, you’ll get better results from an angle lower than eye level, closer to a ground-level. Perspectives that are different from our boring eye height will end in good results.

Some photographers carry small ladders with them and achieve better results by shooting from above. These little touches, like the differences in the angle, will create significant changes in the photos.
4. Check the weather conditions in advance
Landscape photography is not just something to be done in sunny weather. Actually, having clouds in the sky will make the scene look far more interesting. You can take many different photos in rainy weather or after rain. All types of weather are beautiful in different ways; photography is not only about taking pictures in sunny weather. Bad weather will create a more dramatic effect and it allows you to take photos with more depth.
You can take many different and colorful landscape photos by shooting again and again in various weather conditions. And don’t forget to dress according to the weather.
5. Use a tripod
Using a tripod will give us a big plus to take sharper pictures in case our hands get shaky. It is essential to make sure that the feet of the tripod are fully seated on the ground and that the tripod is correctly adjusted in a slopy area.
The critical issues to consider when purchasing a tripod is that the tripod is of sufficient weight and does not move in windy conditions. Brands such as Gitzo, Manfrotto and Vanguard may be preferred for durable and quality tripods.
6. Use filters
You can get much better results by using filters such as a polarising filter*, a UV filter and an ND filter**. Make sure your filter and lens are clean while shooting.

* Polarising filter: Allows you to make the sky bluer, obtain more saturated colors and prevent reflections in water. It creates a polarised effect like its name says and offers non-reflective images.
** ND filter: Neutral Density filter. It is used for long exposure in daylight. It helps reduce the amount of light that enters the camera sensor and it freezes moving objects. It can be used for shooting rivers, waterfalls, light paintings, etc.
7. Use natural frames
You can use surrounding objects to create a frame in your photo. For example, a composition from behind the leaves of a tree while shooting an autumn landscape would be a perfect natural frame

8. Always shoot in RAW format for post-processing
If you want to process your photos later, you should definitely shoot in RAW format, or RAW + Jpeg format, to avoid data loss. RAW files offer more data. This makes editing a lot easier and more detailed.
9. Learn to edit your photos
Editing and making changes in your photos is perhaps as important as taking the picture itself. This is especially more evident in landscape photographs. The color of the sky, the clouds, the colors of nature, the balance of shadow and light or unwanted objects are where you can intervene at the computer.
So, which programs should you use? There is a lot of software available to edit your photos. However, I can recommend three commonly used ones. The first is Adobe Photoshop, as we all know, the second is Luminar produced by Skylum, and the third is Adobe Lightroom. However, you can do a little research on the internet and find many more programs.
10. Review lots of photos and practice!
You can examine successful landscape photos from various platforms to learn. If the person who took the photo shared the Exif information of the picture, this information might be a guide for you. By examining and imitating them, you can gain a specific command of landscape photography at first, and create your own style in the future.

Cuma Cevik is a Turkish photographer and filmmaker based in London. Originally passionate about oil painting, he discovered photography during his university years. Inspired by the natural beauty of his hometown Bolu, Cuma now travels the world capturing breathtaking landscapes and leads photography trips to stunning destinations.